November 2024

Wednesday, November 20, 2024

Wooden Wall Clocks with Minimalist Designs That Shoppers Love


Wooden Wall Clocks with Minimalist Designs That Shoppers Love

Wooden Wall Clocks with Minimalist Designs That Shoppers Love

In the realm of interior design, the humble wall clock has transcended its utilitarian purpose, becoming a statement piece that reflects personal style and aesthetic sensibilities. Among the myriad of clock designs available, minimalist wooden wall clocks have emerged as a popular choice for discerning shoppers. Their clean lines, natural warmth, and understated elegance seamlessly blend into diverse decor styles, adding a touch of sophistication and timeless appeal to any space.

The Allure of Minimalism in Interior Design

Minimalist design principles prioritize simplicity, functionality, and a sense of order. By eliminating unnecessary embellishments and focusing on essential elements, minimalist aesthetics create a serene and calming ambiance. This philosophy resonates deeply with modern lifestyles, where clutter and distractions are often overwhelming.

Wooden wall clocks, with their inherent natural beauty and tactile appeal, perfectly embody the minimalist ethos. The warm hues and intricate grain patterns of wood evoke a sense of tranquility and connection to nature, while the absence of excessive ornamentation allows the clock's form and function to take center stage.

Benefits of Wooden Wall Clocks with Minimalist Designs

The popularity of minimalist wooden wall clocks can be attributed to a confluence of benefits:

Aesthetic Versatility

Minimalist designs effortlessly blend with a wide range of interior styles, from contemporary and modern to Scandinavian and farmhouse. Their neutral palette and simple lines complement bold accent colors, textured surfaces, and statement furniture, creating a harmonious and balanced aesthetic.

Timeless Appeal

Unlike trend-driven designs that quickly fade into obscurity, minimalist wooden wall clocks exude a timeless quality. Their simple forms and natural materials remain relevant across generations, ensuring that they remain a cherished part of your home décor for years to come.

Enhanced Functionality

Minimalist clocks prioritize clarity and readability. The absence of excessive ornamentation ensures that the time display remains the focal point, allowing for easy and accurate timekeeping.

Environmental Sustainability

Wood is a renewable and sustainable resource, making wooden wall clocks a more eco-conscious choice compared to clocks made from synthetic materials. By opting for clocks crafted from responsibly sourced wood, you can contribute to environmental conservation.

Unique Character

Each piece of wood possesses its own unique grain pattern and texture, making every wooden wall clock a one-of-a-kind work of art. This natural variation adds a touch of individuality and character to your home décor.

Types of Minimalist Wooden Wall Clocks

The world of minimalist wooden wall clocks offers a diverse range of styles to suit every taste and design preference:

Geometric Clocks

Geometric clocks feature clean lines, sharp angles, and simple shapes, creating a modern and contemporary aesthetic. They often incorporate materials such as metal or acrylic alongside wood, adding a touch of industrial chic.
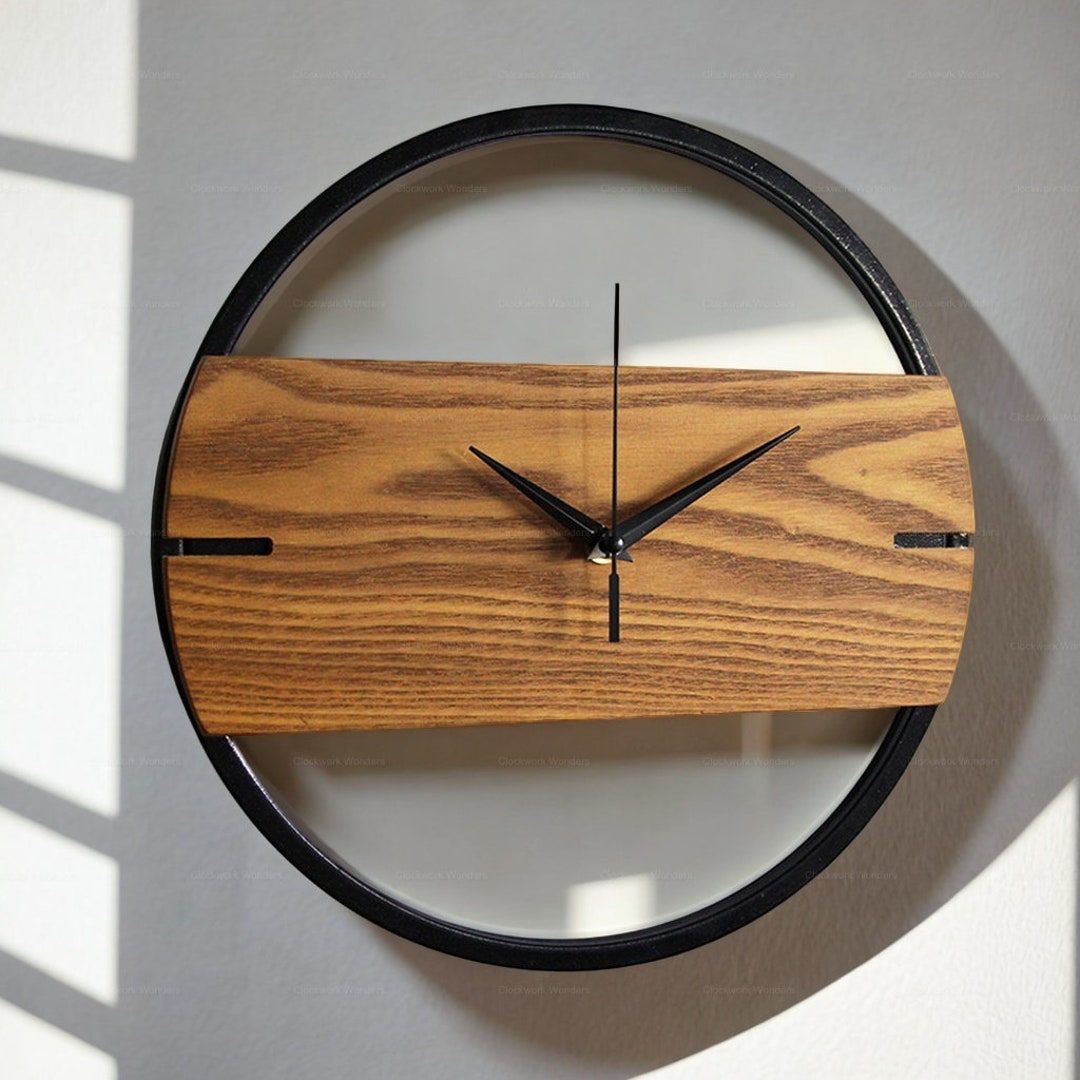
Circular Clocks

Circular clocks embody a classic and timeless aesthetic. They can range from sleek and minimalist designs with a single hand to more intricate models with Roman numerals or Arabic numerals. The circular form creates a sense of balance and harmony within any space.

Rustic Clocks

Rustic wooden wall clocks evoke a sense of warmth and nostalgia. They often feature distressed wood finishes, natural knots, and simple, functional designs. These clocks add a touch of rustic charm to farmhouse, cottagecore, or bohemian decor.

Scandinavian Clocks

Scandinavian minimalist clocks are characterized by their clean lines, light wood tones, and functional simplicity. They often incorporate natural elements such as leather or metal accents, reflecting the minimalist Scandinavian design philosophy.

Tips for Choosing the Perfect Minimalist Wooden Wall Clock

Selecting the right minimalist wooden wall clock for your home involves considering several factors:

Size and Scale

The size of the clock should be proportionate to the wall space and overall room dimensions. A small clock may get lost in a large room, while a large clock may overwhelm a smaller space.

Color and Finish

Choose a clock color and finish that complements your existing décor. Lighter wood tones blend well with neutral palettes, while darker wood tones create a more dramatic statement.

Clock Mechanism

Consider the type of clock mechanism, whether it's quartz, silent sweep, or cuckoo. Quartz clocks are generally more accurate and quiet, while cuckoo clocks add a whimsical touch.

Personal Style

Ultimately, the best minimalist wooden wall clock is one that reflects your personal style and preferences. Explore different designs, materials, and finishes to find a clock that resonates with your aesthetic sensibilities.

Conclusion

Wooden wall clocks with minimalist designs have captured the hearts of shoppers seeking a harmonious blend of style, functionality, and sustainability. Their clean lines, natural warmth, and timeless appeal elevate any space, creating a serene and sophisticated ambiance. By carefully considering the factors outlined above, you can choose a minimalist wooden wall clock that complements your home décor and adds a touch of elegance and charm to your living environment.

Tuesday, November 19, 2024

DIY Multi-Use Blanket Ladders for Extra Storage and Style


DIY Multi-Use Blanket Ladders for Extra Storage and Style

DIY Multi-Use Blanket Ladders for Extra Storage and Style

Hey there, fellow organization enthusiasts! Are you constantly battling with overflowing closets and struggling to find a stylish way to store your extra blankets and throws? Well, fret no more! Today we're diving into the world of DIY blanket ladders. Not only are they a practical way to keep your cozy essentials within easy reach, but they also add a touch of charm and rustic elegance to any room.

Think about it. A blanket ladder is like a stylish and functional piece of furniture that can double as an eye-catching accent. It's a win-win, right? Plus, building your own blanket ladder gives you the freedom to customize it to perfectly match your decor and personal style.

Why Choose a DIY Blanket Ladder?

Beyond the obvious storage benefits, building your own blanket ladder offers some serious advantages:

  • Cost-Effective: You can create a stunning blanket ladder for a fraction of the price compared to buying one from a store.
  • Personalized Style: Choose the perfect wood, stain, and design to perfectly complement your home decor.
  • Sense of Accomplishment: Building something yourself is incredibly rewarding, and the pride you'll feel when you're done is priceless.
  • Great for Beginners: Don't be intimidated! This project is surprisingly easy, even if you're a DIY novice.

Gathering Your Supplies: It's Time to Shop!

Before you start building, make sure you have everything you need. Don't worry, this list isn't too long, and most of the supplies can be found at your local hardware store.

Materials:

  • Wood:
    • Two pieces of 1x2 lumber (for the ladder rungs)
    • Two pieces of 1x4 lumber (for the ladder sides)
    • One piece of 1x6 lumber (for the top shelf)
  • Screws: 1 1/4-inch wood screws
  • Wood Glue
  • Wood Stain (optional, for a finished look)
  • Paint (optional, for a colorful touch)
  • Sandpaper (for smoothing edges)
  • Level (for ensuring your ladder is straight)
  • Measuring Tape
  • Pencil
  • Drill (with a drill bit that matches your screws)

Step-by-Step Building Guide: Let's Get Crafting!

Now that you've gathered your supplies, let's break down the building process into easy-to-follow steps. Don't worry, it's easier than you think!

Step 1: Cut Your Lumber

Using your measuring tape and a pencil, mark the lumber for cutting. For the ladder sides, you'll need two pieces that are the desired height of your ladder (for example, 60 inches). For the ladder rungs, cut pieces that are the desired width of your ladder (for example, 16 inches). Make sure to account for the thickness of the ladder sides when measuring for the rungs. You'll also want to cut the shelf to the desired width for your ladder.

Now, carefully use a saw (hand saw, circular saw, or jigsaw â€" choose what you're most comfortable with) to cut your lumber to the marked lengths. Remember to wear safety glasses during cutting!

Step 2: Sanding and Staining (Optional)

Before assembling, you'll want to smooth out any rough edges by sanding your cut pieces with sandpaper. Start with a rough grit sandpaper (like 80 grit) to remove any imperfections, then gradually move to finer grits (like 120 or 220 grit) for a smoother finish.

If you're going for a stained look, now is the time to apply your chosen wood stain. Let the stain dry completely before moving on to the next step.

Step 3: Assembling the Ladder Sides

Lay your two ladder side pieces down, parallel to each other. Now, place your ladder rungs between the sides. Make sure the rungs are evenly spaced, using your measuring tape to check.

Use wood glue to secure each rung to the ladder sides. Make sure to apply a generous amount of glue along the edges where the rungs meet the sides. Then, secure the rungs with screws. For extra stability, drill pilot holes slightly smaller than the screw size to prevent splitting the wood.

Step 4: Attaching the Top Shelf

Now, place the top shelf on top of the ladder. Position it so that it's centered and securely attached to the ladder sides. Use wood glue and screws to attach the shelf, just like you did with the rungs.

Step 5: Finishing Touches

Once the ladder is assembled, it's time to make it look fantastic! If you chose to paint your ladder, now is the time to add your color. Let the paint dry completely before adding any additional finishing touches.

Step 6: Enjoy!

Congratulations, you just created your very own DIY blanket ladder! Now, find the perfect spot in your bedroom, living room, or any other space where you want to add some cozy storage and stylish charm. Hang your favorite blankets and throws, and admire your handiwork.

Creative Ways to Style Your Blanket Ladder

The beauty of DIY blanket ladders is that they're incredibly versatile! Here are some creative ideas for styling your new creation:

  • Throws and Blankets: The classic use, of course! Hang your cozy blankets and throws in a variety of colors and textures for a visually appealing and practical solution.
  • Towels and Washcloths: In a bathroom, a blanket ladder can become a stylish towel rack.
  • Plants and Vases: Add a touch of greenery by displaying potted plants or vases on the shelf and hanging decorative garlands or vines from the rungs.
  • Scarves and Jewelry: In a bedroom, use the ladder to showcase your favorite scarves, jewelry, or hats.
  • Decorative Items: Let your creativity run wild! Display framed photos, vintage books, artwork, or other small decorative items.

Commonly Asked Questions

Here are some common questions that you might have about DIY blanket ladders.

Q: What kind of wood should I use for my blanket ladder?

The best wood choice really depends on your personal preference and style. Some popular options include pine (affordable and easy to work with), oak (strong and durable), maple (beautiful grain pattern), and cedar (natural scent and resistance to insects).

Q: How do I make sure my ladder is sturdy?

Use high-quality wood, make sure your cuts are precise, and use plenty of wood glue and screws. You can also add additional support to the ladder by adding diagonal braces or using thicker lumber.

Q: Can I paint my ladder?

Absolutely! Paint is a fantastic way to personalize your ladder and make it match your decor. Choose a color that complements your furniture and walls.

Q: Where should I place my blanket ladder?

The placement depends on where you're storing your blankets or other items. A bedroom wall, living room corner, or even a bathroom wall are all excellent options.

There you have it â€" a comprehensive guide to building your own DIY blanket ladder! You're now equipped with the knowledge and confidence to create a beautiful and functional storage solution for your home. Get ready to impress your friends and family with your creativity and handy skills. Happy crafting!

Rustic Floating Shelves Ideas for a Cozy, Warm Vibe


Rustic Floating Shelves Ideas for a Cozy, Warm Vibe

Rustic Floating Shelves: Adding Cozy Warmth to Your Home

Hey there, fellow home decor enthusiast! Are you looking to add some rustic charm and warmth to your space? Floating shelves are a fantastic way to do just that, and they can be super versatile too! Let's dive into the world of rustic floating shelves, exploring why they're so awesome and how you can make them work for your home.

Why Rustic Floating Shelves Rock

Rustic floating shelves are like a hug for your walls, adding a touch of natural beauty and a comforting feel. They're all about that cozy, lived-in vibe that makes a house feel like a home. And the best part? They're super easy to install and incredibly adaptable. Let's break down why they're so cool:

Visual Appeal

Rustic floating shelves have a unique ability to blend seamlessly with different styles, whether you're into farmhouse chic, modern industrial, or even a touch of bohemian. The natural textures and colors of wood instantly add warmth and character, making your space feel more inviting and homey.

Space-Saving Wonders

Okay, so let's be honest, we all have those little nooks and crannies that can be tricky to utilize. Floating shelves come to the rescue! They're perfect for maximizing vertical space, giving you more room to showcase your favorite things and keep things organized.

Easy to Customize

The beauty of rustic floating shelves is that you can really personalize them! You can choose different wood types, stain colors, and even add unique finishes to match your style and personality.

Choosing the Perfect Rustic Floating Shelves

Now, let's talk about the fun part - picking the right rustic floating shelves! Here are some key things to consider:

Wood Type

There's a whole world of wood options out there! Here are some popular choices for a rustic look:

  • Reclaimed wood: This is a fantastic way to add a touch of history and character to your shelves. It's often rich in color and texture, making it perfect for that rustic vibe.
  • Pine: This is a classic choice known for its soft texture and natural knots. It's often affordable and easy to work with.
  • Walnut: This wood is a bit more luxurious, known for its rich, dark color and stunning grain patterns.
  • Oak: This sturdy wood is known for its durability and beautiful grain. It can be a bit pricier, but it will last you a long time.

Size and Shape

Think about the space where you're planning to put the shelves. Do you need long, narrow shelves or short, wide ones? Also, consider the items you'll be displaying on them. You want to choose shelves that are the right size to showcase your treasures without looking crowded.

Finish

A little bit of finish can go a long way in creating the perfect rustic look. Consider these options:

  • Natural wood finish: Embrace the natural beauty of the wood by leaving it untreated. This is perfect for a rustic look.
  • Stained finish: Stain can enhance the wood's natural color and bring out the grain patterns. Popular choices for a rustic look include dark brown, walnut, or red mahogany stains.
  • Whitewash finish: Whitewash creates a soft, weathered look that's perfect for adding a touch of farmhouse charm.

Installation

Don't worry, installing rustic floating shelves isn't rocket science! Most shelves come with a simple bracket system that allows you to attach them directly to your walls. You'll need to use a stud finder to locate the wall studs for secure support, especially if you're putting heavy things on your shelves.

Rustic Floating Shelves: Styling Ideas

The possibilities are endless when it comes to styling your rustic floating shelves! Here are some ideas to spark your imagination:

Books and Magazines

Classic books and magazines always look charming on rustic shelves. Create a cozy reading nook by stacking up your favorite reads.

Plants and Greenery

Add a touch of life and freshness with plants! Choose small succulents, herbs, or even faux greenery for a natural feel.

Family Photos and Artwork

Showcase your favorite memories and art pieces on your shelves. You can use frames, canvases, or even just clip your photos and artwork to make a unique display.

Decorative Objects

Add personality to your shelves with decorative objects like vintage candlesticks, antique jars, or handmade pottery. Don't be afraid to mix and match different textures and colors.

Practical Storage Solutions

Beyond the aesthetics, rustic floating shelves can be practical too! Use baskets, boxes, or trays to organize small items like keys, mail, or craft supplies.

Commonly Asked Questions

Here are some common questions people have about rustic floating shelves:

What are rustic floating shelves made of?

Most rustic floating shelves are made of wood. However, some may be made of metal, reclaimed materials, or even a combination of materials to create unique designs.

How do I install rustic floating shelves?

The installation process varies depending on the type of shelf and the installation method. But generally, it involves using brackets, screws, and wall anchors to securely attach the shelves to the wall.

Where can I find rustic floating shelves?

You can find rustic floating shelves at a variety of places, including home improvement stores, furniture stores, and online retailers. You can also create your own shelves using reclaimed wood or other DIY materials.

How do I style rustic floating shelves?

When styling rustic floating shelves, focus on creating a cohesive and inviting look. Use natural elements, neutral colors, and textures to complement the rustic aesthetic. Consider showcasing your favorite items, like plants, books, photos, or decorative objects, to personalize your shelves.

And there you have it! Rustic floating shelves are a simple yet effective way to infuse your home with warmth and character. Remember, the most important thing is to choose styles and materials that speak to you and make your space feel like a true reflection of yourself. Happy decorating!

Monday, November 18, 2024

DIY Welcome Signs for the Home That Sell Well


DIY Welcome Signs for the Home That Sell Well

DIY Welcome Signs for the Home That Sell Well

Creating a welcoming and inviting ambiance at your home is a key factor in boosting curb appeal. A well-crafted DIY welcome sign can elevate your home's charm and add a personalized touch. But beyond aesthetics, these signs can also be a lucrative endeavor. With a touch of creativity and a keen eye for design, you can craft welcome signs that not only enhance your home but also attract potential buyers, generating a good return on investment.

Key Factors for Success

Before you pick up your paintbrush or hammer, consider these key factors that can make your DIY welcome signs a success:

Target Audience

Think about who you're trying to reach with your signs. Are you targeting families, young professionals, or a specific style aesthetic? Understanding your audience will help you determine the appropriate colors, fonts, and themes.

Materials and Style

Experiment with different materials like wood, metal, or reclaimed items to create unique and eye-catching signs. Consider the style of your home and neighborhood when choosing materials and design elements. A rustic sign might be perfect for a farmhouse, while a modern sign with clean lines might be ideal for a contemporary home.

Personalization

Personalized touches add a special element to your signs. Consider incorporating your home's address, a family name, or a meaningful quote that reflects your personality.

Trending Welcome Sign Ideas

Here are some popular welcome sign ideas that often resonate with potential buyers:

Rustic Charm

Embrace the warmth and natural beauty of wood with a rustic welcome sign. Use reclaimed barn wood or distressed planks for a vintage feel. Add touches of rustic charm with elements like twine, metal accents, and greenery.

Modern Minimalism

For a sleek and contemporary look, create a welcome sign using clean lines, geometric shapes, and bold typography. Metal, acrylic, or even painted canvas can be used for a modern aesthetic.

Seasonal Flair

Embrace the changing seasons with themed welcome signs. Use fall colors, wintery landscapes, or spring blooms to create a welcoming atmosphere. These signs can be rotated seasonally to keep your curb appeal fresh.

Tips for Crafting a Winning Welcome Sign

Now that you have some inspiration, let's dive into the practical tips for crafting a DIY welcome sign that sells:

  • Use High-Quality Materials: Invest in durable materials that will withstand the elements and last for years. This demonstrates attention to detail and quality craftsmanship.
  • Keep It Concise: A short and sweet message is more impactful than a long, rambling one. Stick to simple greetings like "Welcome Home" or "Our Happy Place."
  • Choose a Readable Font: Select a font that is easy to read from a distance and complements the overall style of your sign.
  • Pay Attention to Color: Choose colors that are inviting and complement your home's exterior. Consider using contrasting colors for a bold statement.
  • Add Visual Interest: Incorporate elements like decorative hardware, stencils, or even hand-painted details to add personality and dimension to your sign.

Selling Your DIY Welcome Signs

If you're looking to turn your crafting skills into a side hustle, here are some ways to sell your DIY welcome signs:

  • Online Marketplaces: List your signs on platforms like Etsy, Facebook Marketplace, or Craigslist.
  • Local Craft Shows: Showcase your signs at craft fairs and farmers markets. This allows you to interact with potential customers and gain valuable feedback.
  • Social Media: Use Instagram, Pinterest, and Facebook to promote your signs and build a following.
  • Partner with Local Businesses: Collaborate with home décor stores, gift shops, or real estate agents to sell your signs through their channels.

With a little creativity and effort, you can craft DIY welcome signs that not only enhance your home's charm but also become a profitable venture. Remember to focus on quality materials, a thoughtful design, and a personal touch to create signs that resonate with potential buyers and add a warm welcome to every doorstep.

Wednesday, November 13, 2024

Floating Shelf Ideas for Small Spaces: DIY Projects You Can Tackle


Floating Shelf Ideas for Small Spaces: DIY Projects You Can Tackle

Floating Shelf Ideas for Small Spaces: DIY Projects You Can Tackle

In the realm of interior design, maximizing space is paramount, especially for those dwelling in compact abodes. Floating shelves, with their minimalist aesthetic and space-saving prowess, offer a compelling solution. These ingenious structures seamlessly integrate into any decor, providing a versatile platform for showcasing cherished possessions, displaying decorative accents, or simply creating functional storage solutions.

This guide delves into the realm of DIY floating shelves, empowering you to craft these stylish fixtures with minimal effort and expense. Whether you're a seasoned DIY enthusiast or a novice eager to embark on your first woodworking project, the instructions provided will guide you through each step, from selecting materials to installing the finished product.

The Appeal of Floating Shelves

Floating shelves hold an undeniable allure, emanating an air of modern sophistication that complements a wide range of interior styles. Their sleek, minimalist design eliminates the visual clutter of traditional shelving units, creating an illusion of spaciousness that belies the actual footprint.

Beyond their aesthetic appeal, floating shelves offer a multitude of practical advantages, particularly in small spaces. Their wall-mounted configuration liberates valuable floor space, allowing for more flexible furniture arrangement and maximizing the overall sense of openness.

DIY Floating Shelves: Unleashing Your Creativity

Embarking on a DIY floating shelf project is an engaging and rewarding endeavor that empowers you to customize the final product to your exact specifications. From selecting materials to determining the shelf's dimensions, you have complete control over the design, ensuring it perfectly complements your existing décor and personal style.

Materials and Tools for Success

Before diving into the construction process, gather the necessary materials and tools, ensuring a smooth and enjoyable experience.

  • Wood: Pine, maple, oak, and walnut are popular choices for floating shelves. Consider the aesthetic and durability requirements of your project.
  • Brackets: These sturdy metal fixtures provide the necessary support for the shelves. Opt for brackets specifically designed for floating shelves, ensuring secure and concealed installation.
  • Screws: Use screws of appropriate length and strength, ensuring a secure connection between the brackets and the wall.
  • Wood Glue: Use a high-quality wood glue to reinforce the joints between the shelf and the brackets.
  • Measuring Tape: Essential for determining the accurate dimensions of your shelves.
  • Level: Ensure that your shelves are installed perfectly level and aesthetically pleasing.
  • Saw: A handsaw, jigsaw, or circular saw will be required to cut the wood to your desired size.
  • Drill: Use a drill to create pilot holes for the screws, preventing wood splitting.
  • Sandpaper: Smooth any rough edges on the wood with sandpaper.
  • Finishing Touches: Choose a stain or paint to enhance the appearance of your shelves, complementing your existing décor.

Step-by-Step Guide to Building Floating Shelves

Now that you have gathered the necessary materials and tools, follow these instructions for constructing your floating shelves:

  1. Determine the Shelf Dimensions: Measure the desired width, depth, and number of shelves. Consider the weight of the items you plan to display and ensure that the shelves are sturdy enough to support the load.
  2. Cut the Wood: Using your saw of choice, carefully cut the wood to the dimensions determined in the previous step. Ensure clean, straight cuts for a professional finish.
  3. Sand the Edges: Use sandpaper to smooth any rough edges on the cut wood, preventing splinters and enhancing the overall aesthetic.
  4. Choose and Install Brackets: Select brackets that are appropriate for the weight of the shelves and the type of wall material. Install the brackets securely to the wall using screws and a level, ensuring that they are perfectly horizontal and level with one another. Refer to the manufacturer's instructions for specific installation details.
  5. Attach the Shelves to Brackets: Apply wood glue to the underside of the shelf boards where they will contact the brackets. Position the shelves onto the brackets, ensuring that they are centered and flush with the wall. Secure the shelves to the brackets using screws, driving them through the pre-drilled holes.
  6. Finishing Touches: Once the shelves are installed, apply a stain or paint to enhance their appearance and complement your existing décor. Allow the finish to dry completely before loading the shelves with your treasured possessions or decorative accents.

Creative Ideas for Floating Shelves

The beauty of DIY floating shelves lies in their versatility, allowing you to unleash your creativity and personalize them to your unique taste and preferences. Explore these inspiring ideas to unlock the full potential of these space-saving fixtures:

Showcase Your Style

  • Bookshelves: Create a stunning literary haven by showcasing your favorite novels, biographies, or cookbooks. Use different shelf sizes to create visual interest and highlight specific titles.
  • Photo Gallery: Display cherished memories with a curated collection of framed photographs, art prints, or postcards. Use floating shelves to create a cohesive and captivating visual narrative.
  • Plant Display: Transform your space into a verdant oasis with a display of lush foliage. Arrange plants in various sizes and shapes, creating a cascading effect that brings a touch of nature indoors.
  • Kitchen Essentials: Optimize kitchen space with floating shelves for storing spices, herbs, cookbooks, or decorative accents. Utilize shelf dividers to create compartments for organization.
  • Bathroom Storage: Free up valuable counter space in the bathroom by installing floating shelves for storing toiletries, towels, or decorative elements.
  • Entryway Solutions: Enhance the functionality of your entryway with floating shelves to store keys, mail, or decorative items. Choose a rustic or modern style to complement your entryway decor.

Think Beyond the Ordinary

Break free from traditional design conventions and explore these innovative floating shelf ideas:

  • Corner Shelves: Utilize those often overlooked corner spaces with custom-designed corner shelves. Enhance functionality and maximize space in any room.
  • Backlit Shelves: Create a captivating display with integrated LED lighting. Illuminate books, photographs, or decorative accents, adding a touch of drama and sophistication.
  • Floating Desk: Combine a floating shelf with a sleek, minimalist desk surface, creating a compact yet functional workspace.
  • Floating Bedside Table: Replace bulky bedside tables with floating shelves, adding a touch of modern elegance to your bedroom while freeing up valuable floor space.
  • Floating Storage Bench: Craft a multi-functional piece of furniture by incorporating a storage bench design into your floating shelves. This ingenious solution adds seating, storage, and a touch of style to your space.

Conclusion

Floating shelves are a versatile and stylish solution for enhancing the aesthetics and functionality of small spaces. Their minimalist design seamlessly integrates into any décor, while their space-saving prowess creates an illusion of openness and maximizes the overall sense of spaciousness.

Embark on a DIY floating shelf project to unleash your creativity and personalize these structures to your unique taste and preferences. From selecting materials and determining dimensions to applying finishing touches, you have complete control over the design process. Embrace the rewarding experience of crafting custom shelves that not only enhance your home but also reflect your unique personality and style.

Table Chess Designs That Will Appeal to Chess Lovers and Buyers


Table Chess Designs That Will Appeal to Chess Lovers and Buyers

Table Chess Designs That Will Appeal to Chess Lovers and Buyers

Chess, the timeless game of strategy and intellect, has captivated minds for centuries. But beyond its classic gameplay, a chess set can be a beautiful and cherished piece of art, reflecting its owner's personality and passion. When choosing a chess table, discerning buyers seek more than just functionality; they desire a design that elevates their playing experience and enhances their home décor. This article explores the table chess designs that captivate chess enthusiasts and appeal to buyers seeking style, craftsmanship, and unique character.

Modern Minimalism: Clean Lines and Contemporary Elegance

For those who value simplicity and understated elegance, modern minimalist chess tables are a perfect choice. These tables often feature clean lines, sleek surfaces, and a neutral color palette. They seamlessly integrate into modern interiors, creating a sophisticated and serene atmosphere.

Key Design Elements:

  • Geometric Shapes: Squares, rectangles, and circles create a sense of order and balance.
  • Metallic Finishes: Silver, gold, or black accents add a touch of luxury and sophistication.
  • Glass Tops: Transparent glass surfaces enhance the sleekness of the design, showcasing the intricate details of the chess pieces.

Classic Elegance: Timeless Designs for a Touch of History

Classic chess tables evoke a sense of tradition and sophistication. Drawing inspiration from historical designs, these tables often feature intricate carvings, rich wood finishes, and elegant accents.

Key Design Elements:

  • Intricate Carvings: Detailed carvings on the table legs, borders, or even the chessboard itself add a touch of artistry and sophistication.
  • Dark Wood Finishes: Mahogany, walnut, or rosewood provide a warm and classic aesthetic.
  • Brass Accents: Brass hardware, inlays, or chess pieces add a touch of warmth and a timeless appeal.

Whimsical and Unique: Breaking the Mold with Creative Designs

For those who embrace individuality and creativity, whimsical chess tables offer a refreshing departure from traditional designs. These tables break the mold with unique shapes, bold colors, and unexpected materials.

Key Design Elements:

  • Abstract Shapes: Organic curves, geometric patterns, or unconventional forms create a visually captivating statement.
  • Bold Colors: Vibrant hues and contrasting accents add a playful and eye-catching element.
  • Unconventional Materials: Glass, metal, stone, or even recycled materials can add a unique touch to the table.

Personalized Choices: Creating a Table as Unique as You Are

The beauty of chess tables lies in their versatility. Buyers can personalize their tables to reflect their individual taste and style.

Customization Options:

  • Custom Dimensions: Ensure a perfect fit for your playing space.
  • Personalized Engraving: Add your initials, a special date, or a meaningful quote.
  • Customizable Chess Pieces: Choose from a vast array of materials, styles, and themes to personalize your game.

Whether you prefer the clean lines of modern minimalism, the timeless elegance of classic designs, or the whimsy of creative expressions, the perfect table chess design awaits. Embrace your individuality, elevate your playing experience, and create a piece of art that will be cherished for generations to come.

Inspiring Woodworking Gift Projects: Unleash Your Creativity


Inspiring Woodworking Gift Projects: Unleash Your Creativity

Inspiring Woodworking Gift Projects: Unleash Your Creativity

In a world filled with mass-produced goods, handcrafted gifts hold a special place. Woodworking, a timeless art, offers the perfect avenue to create unique and meaningful presents for loved ones. From practical pieces to decorative accents, woodworking gift projects provide a tangible expression of care and creativity.

Whether you are a seasoned woodworker or just starting out, this guide will inspire you with a range of projects that are both rewarding to make and cherished to receive.

Practical and Useful Woodworking Gifts

These woodworking projects serve a purpose while showcasing your craftsmanship. They are perfect for those who appreciate functional and durable items.

Cutting Board

A cutting board is a staple in any kitchen, and a handcrafted one is a welcome addition. Choose a beautiful hardwood like maple or cherry for a durable and elegant surface. Consider adding a juice groove to prevent spills and a personalized inscription for a thoughtful touch.

Serving Tray

A serving tray is a versatile piece for entertaining, serving breakfast in bed, or simply adding a touch of charm to the coffee table. Opt for a sturdy wood like walnut or oak and incorporate decorative elements like handles, inlays, or a painted finish.

Wooden Utensil Holder

Keep kitchen utensils organized and within reach with a handcrafted utensil holder. A simple design with a few compartments works well, or you can get creative with different shapes and sizes. Choose a wood that complements the kitchen décor, like bamboo or cherry.

Jewelry Box

A jewelry box is a thoughtful gift for any woman. Choose a small piece of wood, like walnut or cedar, and design a box with compartments and drawers for different jewelry items. Add a lining for a luxurious feel and personalize it with a name or inscription.

Wooden Picture Frame

Showcase cherished memories with a handcrafted picture frame. Choose a wood that complements the photograph, like mahogany for a classic look or birch for a rustic touch. Experiment with different shapes and sizes to create a unique frame.

Decorative and Stylish Woodworking Gifts

These woodworking projects are all about adding beauty and character to a home. They make wonderful gifts for those who appreciate unique and artistic pieces.

Wooden Wall Clock

A wooden wall clock is a timeless and practical piece of home décor. Choose a wood with a beautiful grain pattern, like walnut or oak. Experiment with different clock mechanisms and personalize the clock with a unique design.

Wooden Wall Art

From abstract designs to intricate geometric patterns, wooden wall art allows you to express your creativity. Experiment with different woods and textures to create a piece that complements the recipient's décor.

Wooden Ornaments

Handcrafted wooden ornaments add a personal touch to any Christmas tree. Choose a wood like pine or birch and carve out simple shapes like stars, snowflakes, or birds. Paint them with festive colors or leave them natural for a rustic look.

Wooden Coasters

Protect furniture and add a touch of elegance with handcrafted wooden coasters. Choose a durable wood like maple or cherry and cut out simple shapes like circles, squares, or geometric patterns. Consider adding a decorative element like a mosaic inlay or a laser-engraved design.

Wooden Birdhouse

Attract feathered friends to the garden with a handcrafted birdhouse. Choose a wood that is resistant to weather and insects, like cedar or redwood. Design a birdhouse with multiple compartments and a decorative roof to add visual interest.

Tips for Creating Unique and Meaningful Woodworking Gifts

Here are some tips to ensure your woodworking gift projects are not only beautiful but also truly special:

  • Consider the recipient's taste and style. Choose a project that suits their preferences and décor.
  • Use high-quality materials. Invest in durable woods that will stand the test of time.
  • Pay attention to detail. Take pride in your craftsmanship and ensure a smooth and polished finish.
  • Add a personal touch. Incorporate a name, date, or special message for a unique and meaningful gift.
  • Present your gift thoughtfully. Wrap it in beautiful paper and add a handwritten card expressing your appreciation.

Beyond the Woodshop: Exploring Additional Gift Ideas

While woodworking projects offer a tangible and creative approach to gifting, there are other avenues to consider:

  • Personalized Wooden Boxes: Create custom-made boxes for storing valuables, tools, or other treasured items.
  • Wooden Signs and Plaques: Design unique signs for homes, gardens, or businesses with personalized messages or decorative elements.
  • Wooden Toys: Craft educational and engaging toys for children using natural and safe materials.
  • Wooden Candlesticks and Holders: Create elegant and functional candle holders to enhance any space.
  • Wooden Jewelry: Design and craft unique wooden bracelets, necklaces, and earrings for a personalized touch.

Conclusion: Unleashing Creativity and Bringing Joy

Woodworking offers a rewarding and creative outlet for crafting unique and meaningful gifts. From practical pieces to decorative accents, these projects provide a tangible expression of care and appreciation. Whether you are a seasoned woodworker or just starting out, let your creativity flourish and create gifts that bring joy to those you cherish.

Beginner Woodworking Projects to Decorate Your Home


Beginner Woodworking Projects to Decorate Your Home

Beginner Woodworking Projects to Decorate Your Home

Hey there, woodworking enthusiast! Ready to transform your home with your own handcrafted creations? You don't need to be a seasoned pro to create beautiful and functional pieces. In fact, woodworking is a fantastic hobby for beginners, offering a sense of accomplishment and a unique way to personalize your space.

Today, we're going to dive into some beginner-friendly woodworking projects that are perfect for sprucing up your home. These projects are designed to be easy to follow, requiring basic tools and materials that you can find at most hardware stores. So grab your hammer, saw, and a sprinkle of creativity, and let's get started!

Simple and Stylish Shelves

Floating shelves are a fantastic way to add storage and visual interest to your walls. They're super versatile and can be used in any room, from your living room to your kitchen or even your bathroom. The best part? They're surprisingly easy to make!

What You'll Need:

  • Wood boards (pine, oak, or maple work well)
  • Wood stain or paint (optional)
  • Screws
  • Measuring tape
  • Level
  • Drill
  • Saw (circular saw or jigsaw)
  • Sandpaper

Let's Build:

  1. Measure and cut: Determine the size and number of shelves you need. Use your saw to cut the boards to the desired length and width.
  2. Sand the edges: Smooth out any rough edges with sandpaper. This will ensure a clean and polished look.
  3. Apply stain or paint (optional): If you want to add color or a unique finish, apply stain or paint to the shelves. Let it dry completely before moving on.
  4. Mark and drill mounting holes: Use a pencil to mark the location of the mounting brackets on the wall. Drill pilot holes at the marked locations to make installing the screws easier.
  5. Install the mounting brackets: Secure the brackets to the wall using screws. Make sure they are level and securely attached.
  6. Slide the shelves onto the brackets: Carefully slide the shelves onto the brackets, ensuring they are level and stable.

Voilà! Your shelves are ready to display your favorite books, plants, or decorative items. Remember, you can personalize these shelves with different sizes, shapes, and finishes to suit your style.

Rustic Wooden Coasters

Who doesn't love a good set of coasters? They protect your furniture from unsightly rings and add a touch of personality to your coffee table. This project is a great way to utilize leftover wood scraps or even repurposed materials.

What You'll Need:

  • Small pieces of wood (approximately 4 inches in diameter)
  • Sandpaper
  • Wood glue (optional)
  • Felt pads
  • Wood stain or paint (optional)

Let's Build:

  1. Cut and sand: Cut your wood pieces into circles using a jigsaw or a coping saw. Sand the edges and surfaces smooth to ensure a comfortable feel.
  2. Apply wood glue (optional): If you're using thin pieces of wood, you can add extra stability by applying wood glue to the underside of each coaster before attaching the felt pads.
  3. Attach the felt pads: Apply a small amount of wood glue or a strong adhesive to the back of each felt pad and press it onto the underside of the coaster. Make sure the pads are centered.
  4. Stain or paint (optional): Add a personal touch by staining or painting your coasters. Allow the finish to dry completely before using them.

Your rustic coasters are ready to add a touch of warmth and charm to your coffee table or bar. Experiment with different wood types and finishes to create a unique set that reflects your style.

Easy-to-Make Wooden Wall Decor

Transform plain walls into stunning focal points with simple wooden wall art. You can create abstract designs, geometric patterns, or even personalized messages for a truly unique touch.

What You'll Need:

  • Wood pieces (various sizes and shapes)
  • Sandpaper
  • Wood glue
  • Wood stain or paint (optional)
  • Mounting tape or adhesive

Let's Build:

  1. Cut and sand: Cut your wood pieces into various sizes and shapes. You can use a jigsaw, handsaw, or even a scroll saw for intricate designs. Sand the edges smooth.
  2. Arrange and glue: Create your desired design by arranging the wood pieces on a flat surface. Once you're satisfied, use wood glue to secure the pieces together.
  3. Apply stain or paint (optional): Give your wall art a cohesive look by applying stain or paint. Let it dry completely before proceeding.
  4. Attach to the wall: Use mounting tape or adhesive to securely attach the wall art to your chosen location.

Voilà! You've created a stunning piece of wooden wall art that complements your home décor. Get creative with shapes, colors, and textures to make a statement.

Beyond the Basics: Woodworking for Beginners

These projects are just a taste of what you can achieve with a little bit of woodworking knowledge and practice. As you become more comfortable, you can explore other exciting projects, like building a small wooden stool, crafting a decorative box, or creating a personalized cutting board.

Remember, practice makes perfect. Don't be afraid to experiment and learn from your mistakes. The beauty of woodworking is that you can always try again and refine your skills.

Here are some additional tips for beginner woodworkers:

  • Start small: Choose projects that are manageable in size and complexity.
  • Focus on safety: Always wear eye protection and use appropriate safety gear when working with tools.
  • Invest in quality tools: While you can start with basic tools, investing in high-quality tools will make your woodworking experience more enjoyable and efficient.
  • Join a woodworking community: Connect with other woodworkers online or in person to share ideas, get advice, and learn from each other.
  • Have fun! Woodworking should be a rewarding and enjoyable experience. Don't be afraid to get creative and let your imagination run wild.

So, what are you waiting for? Pick up those tools, unleash your creativity, and start crafting beautiful woodworking projects that will transform your home. Happy building!

Stylish Wooden Creations for the Perfect Gift


Stylish Wooden Creations for the Perfect Gift

Stylish Wooden Creations for the Perfect Gift

In a world saturated with mass-produced trinkets, finding a gift that speaks to both the heart and the eye can be a challenge. Enter the timeless beauty of wood, a material that exudes warmth, durability, and an undeniable charm. Handcrafted wooden creations offer a unique and thoughtful gift option that will be cherished for years to come.

Beyond the Ordinary: Unveiling the Magic of Wooden Gifts

Why choose wood? It's more than just a material; it's a statement. Wooden gifts whisper stories of craftsmanship, sustainability, and a connection to nature. They offer a distinct alternative to plastic and mass-produced goods, reflecting a conscious choice for quality and individuality.

Elevating Everyday Objects: From Coasters to Cutting Boards

Think beyond the typical vase or picture frame. Wooden creations can elevate everyday objects into stunning focal points. Imagine a set of intricately carved coasters gracing your coffee table or a sturdy, hand-finished cutting board taking center stage in your kitchen. These practical pieces become conversation starters, showcasing the artistry of wood and adding a touch of warmth to your home.

Personalized Treasures: Capturing Memories in Wood

The beauty of wood extends beyond its aesthetics; it can be transformed into personalized treasures that hold sentimental value. Imagine a custom-engraved wooden box holding cherished keepsakes or a personalized cutting board commemorating a special occasion. These pieces transcend mere gifts; they become heirlooms, passed down through generations, carrying with them a story that grows richer with time.

Crafting the Perfect Gift: A Journey of Discovery

Discovering the perfect wooden gift involves a journey of exploration. Take the time to delve into the world of handcrafted treasures. You'll find a spectrum of styles, from rustic to minimalist, each reflecting the unique vision of the artisan. Here are some considerations for your search:

  • The Occasion: What is the gift for? Is it a birthday, a wedding, or a housewarming? The occasion will guide your choice of item and its style.
  • The Recipient's Style: Does the recipient prefer modern, rustic, or traditional aesthetics? Consider their personal tastes when selecting a piece.
  • The Wood Type: Explore different wood types, each with its unique grain pattern, color, and durability. Popular choices include walnut, maple, cherry, and oak.
  • The Artist's Story: Discover the passion behind the craft. Connecting with the artisan adds a personal touch and provides a deeper appreciation for the piece.

Beyond the Gift: A Commitment to Sustainability

Choosing wooden creations goes beyond acquiring a beautiful gift. It's a commitment to sustainability and supporting artisans who work with natural materials. By choosing wood, you're contributing to a circular economy, where resources are used responsibly and waste is minimized.

Wooden gifts are more than just objects; they are reflections of nature's beauty, human craftsmanship, and the enduring power of a thoughtful gesture. When you choose a wooden creation, you're not just giving a present; you're giving a piece of your heart, a piece that will be cherished for years to come.

Exceptional Wood Gifts That Tell a Story


Exceptional Wood Gifts That Tell a Story

Exceptional Wood Gifts That Tell a Story

Looking for a gift that's truly unique and meaningful? Look no further than wood! It's a natural material that's both beautiful and durable, and it can be crafted into all sorts of amazing things. Plus, wood has a story to tell. Every piece of wood has a history, from the tree it came from to the hands that shaped it. So, when you give a wooden gift, you're giving a piece of history and a reminder of a special moment in time.

What's even better is that there's a wooden gift for everyone! Whether you're searching for a thoughtful present for a friend, a romantic gift for your partner, or a unique keepsake for yourself, there's a piece of wood waiting to be discovered.

Unique Wood Gifts

Personalized Wooden Cutting Boards

Let's face it: everyone loves a good cutting board! It's a kitchen essential, and it's something that gets used every day. So, why not make it extra special with a personalized one? You can get cutting boards engraved with names, dates, initials, or even a special message.

And the best part is that there are endless possibilities for wood types, shapes, and sizes. Think about the person you're buying for. Do they love the rustic look of reclaimed wood? Or maybe they'd appreciate the sleek elegance of walnut or maple? You can even get cutting boards with unique designs, like a state outline or a family crest.

Hand-Crafted Wooden Boxes

Who doesn't love a beautifully crafted wooden box? It's the perfect way to store treasured belongings, from jewelry and watches to keepsakes and trinkets. And just like cutting boards, wooden boxes can be personalized with engravings, inlays, or even a special finish.

There are also countless styles and sizes available. A small, elegant box would be perfect for a ring or a necklace, while a larger box could be used to store mementos or even a special collection. You could even choose a box that's made from a specific type of wood, like cherry or oak, to give it a touch of elegance.

Hand-Turned Wooden Pens

If you know someone who loves to write, a hand-turned wooden pen is a truly special gift. These pens are not only beautiful to look at, but they also feel amazing in the hand. Plus, they're incredibly durable and will last for years to come.

And don't forget the personalization factor! You can get pens engraved with a name, a special date, or a quote. A hand-turned wooden pen is a unique and memorable gift that will be cherished for years.

Wooden Clocks

A wooden clock adds warmth and character to any room. It's a timeless and classic gift that can be enjoyed for years to come. Plus, there are so many different styles to choose from! You can find clocks with rustic, modern, or vintage aesthetics, made from all sorts of woods like mahogany, pine, or even bamboo.

One of the things that makes a wooden clock so unique is its ability to personalize it. You can get a clock engraved with a special message, or you can even choose a clock with a custom design.

Wooden Wine Racks

For the wine lover in your life, a wooden wine rack is a practical and stylish gift. They're a great way to store and display a collection of bottles, and they come in all sorts of sizes and styles. You can find racks that are free-standing, wall-mounted, or even built into a countertop.

Think about what kind of wood would suit their taste. For a more traditional look, choose a dark wood like walnut or mahogany. Or, for a more modern look, opt for a lighter wood like maple or cherry. A personalized wine rack with an engraved message is the perfect finishing touch.

The Story Behind the Wood

One of the things that makes a wooden gift so special is the story behind it. Each piece of wood has a unique history, and that history is woven into the grain and texture of the wood itself.

The wood for your gift could be from a tree that was planted generations ago, or it could be reclaimed from an old building. It could be from a forest in a faraway country, or it could be from a local tree farm. Each piece of wood has its own story to tell, and that story adds a layer of meaning to your gift.

Imagine gifting a cutting board made from reclaimed wood from a historic barn. It's a gift that embodies history, resilience, and a connection to the past. Or maybe it's a wooden box made from reclaimed wood from a ship that sailed the seas. It's a gift that represents adventure, discovery, and a sense of wanderlust.

The story of the wood can also be a story of sustainability. By choosing wood from sustainable sources, you're supporting responsible forestry practices and helping to protect our planet for future generations.

Making a Wooden Gift Even More Special

You can make your wooden gift even more meaningful by adding a personal touch. Here are a few ideas:

  • Include a handwritten card that tells the story of the wood or the reason why you chose that particular gift.
  • Add a small, engraved tag with a special message or date.
  • Package the gift beautifully in natural materials like burlap or twine.
  • Whether you choose a personalized cutting board, a hand-crafted wooden box, or a wooden clock, a wooden gift is a unique and thoughtful way to show someone you care. It's a gift that will be cherished for years to come, and it's a gift that tells a story.

    Tuesday, November 12, 2024

    Create Your Own Coffee Table: DIY Plans + PDF Guide


    Create Your Own Coffee Table: DIY Plans + PDF Guide

    Build Your Own Coffee Table: DIY Plans & PDF Guide

    Looking to add a touch of personal style to your living room while saving some cash? Building your own coffee table is a rewarding DIY project that lets you create a piece that perfectly complements your decor. This comprehensive guide will walk you through the process step-by-step, from choosing materials to finishing touches. Let's dive in!

    Step 1: Design and Planning

    Before you grab your tools, let's get creative! This is the fun part where you bring your vision to life. Consider the following:

    Size and Shape

    Measure your space and decide on a size that suits your needs. Do you want a small and cozy coffee table or a larger one that can double as a dining table? Think about the shape as well â€" square, round, rectangular, or even a unique design. A sketch or a digital design will help you visualize the final product.

    Materials

    Choose your materials wisely. Wood is a popular choice, but you can also explore alternatives like metal, concrete, or even reclaimed materials. Consider your budget and the desired style. Some options include:

    • Wood: Pine, oak, walnut, and plywood offer different looks and price points.
    • Metal: Steel, iron, or even copper can add an industrial or modern touch.
    • Concrete: A great choice for a minimalist, contemporary style.

    Style

    What kind of vibe do you want to achieve? Modern, rustic, farmhouse, industrial, or something else? Your chosen materials and design elements will contribute to the overall style.

    Step 2: Gathering Materials and Tools

    Now it's time to gather the essential materials and tools. Here's a checklist:

    • Wood or other materials
    • Wood glue
    • Screws or nails
    • Sander
    • Sandpaper (various grits)
    • Wood stain or paint (optional)
    • Clear sealant (optional)
    • Measuring tape
    • Saw (circular saw or jigsaw)
    • Drill
    • Level
    • Clamps (optional)

    Step 3: Cutting and Assembling

    Time to put your design into action! Carefully measure and cut your wood or materials to the desired dimensions. Always double-check your measurements before making any cuts. Refer to your design and assembly plans. You can either purchase pre-made plans online or create your own. Use wood glue and screws or nails to secure the pieces together. Make sure to clamp the pieces for a secure fit during the drying time of the glue.

    Step 4: Sanding and Finishing

    Once your table is assembled, it's time to give it a smooth finish. Sand down all the edges and surfaces to create a uniform feel. Start with coarser sandpaper and gradually work your way to finer grits. This will create a polished look and eliminate any rough spots. Consider adding a stain, paint, or a clear sealant to protect the wood and enhance its appearance.

    Step 5: Enjoying Your Creation

    After the final touches, it's time to admire your hard work! Place your coffee table in its new home and enjoy a cup of coffee or tea on your custom-made masterpiece. You've created a piece of furniture that not only adds style to your room but also reflects your creativity and skills.

    Bonus: DIY Coffee Table Ideas and Inspiration

    Here are some exciting ideas for your coffee table project:

    • Reclaimed wood coffee table: Give old wood a new purpose and create a rustic, eco-friendly piece.
    • Industrial-style coffee table: Use metal pipes and salvaged wood for a modern, urban vibe.
    • Mid-century modern coffee table: Choose simple lines and sleek materials for a timeless design.
    • Storage coffee table: Incorporate drawers or shelves for extra storage space.

    Ready to Start? Download Your FREE PDF Guide!

    To help you take your coffee table project from dream to reality, we've created a comprehensive PDF guide. This free guide includes detailed instructions, assembly diagrams, and tips for success. [Link to PDF guide].

    Start your coffee table DIY adventure today and create a piece of furniture that's unique and perfectly reflects your style!

    How to Design a Birdhouse That Complements Your Yard Decor


    How to Design a Birdhouse That Complements Your Yard Decor

    Designing a Birdhouse That Complements Your Yard Decor

    A birdhouse is more than just a shelter for feathered friends; it's an opportunity to enhance the aesthetic appeal of your outdoor space. By thoughtfully designing a birdhouse that complements your existing yard decor, you can create a harmonious and visually pleasing environment. This guide will provide you with a comprehensive approach to designing a birdhouse that seamlessly integrates with your existing landscaping, architecture, and personal style.

    Understanding Your Yard's Aesthetic

    Before embarking on the design process, it's crucial to understand the overall aesthetic of your yard. Consider the following elements:

    Style

    Determine the dominant style of your landscaping and architecture. Is it:

    • Traditional: Characterized by classic designs, natural materials, and symmetrical layouts.
    • Modern: Emphasizes clean lines, minimalist designs, and geometric shapes.
    • Rustic: Features natural elements, weathered wood, and a sense of age.
    • Mediterranean: Involves terracotta, stucco, and vibrant colors inspired by the Mediterranean region.
    • Asian-inspired: Incorporates elements like bamboo, stone, and intricate details.

    Matching the style of your birdhouse to the existing style of your yard creates a cohesive and visually pleasing landscape.

    Color Palette

    Observe the dominant colors in your yard. Do you have:

    • Warm tones: Reds, oranges, yellows, and browns, associated with warmth and comfort.
    • Cool tones: Blues, greens, purples, and grays, known for their calming and serene qualities.
    • Neutral tones: Whites, blacks, grays, and beiges, offering a balanced and understated aesthetic.

    Choose a color for your birdhouse that complements the existing color palette of your yard.

    Materials

    Analyze the materials used in your yard's hardscaping and landscaping. Are they:

    • Natural: Wood, stone, brick, and plants.
    • Man-made: Concrete, metal, and plastic.

    Select materials for your birdhouse that harmonize with the existing materials in your yard.

    Designing a Complementary Birdhouse

    Once you have a clear understanding of your yard's aesthetic, you can begin designing a birdhouse that complements it. Here are some key considerations:

    Shape and Size

    The shape and size of your birdhouse should align with the overall style of your yard.

    • Traditional: Consider classic shapes like A-frames, gable roofs, and quaint cottages.
    • Modern: Opt for geometric shapes, clean lines, and minimalist designs.
    • Rustic: Choose natural shapes like tree trunks or weathered wood boxes.
    • Mediterranean: Incorporate terracotta tiles, arches, and rounded designs.
    • Asian-inspired: Feature pagoda-like roofs, bamboo details, and elegant curves.

    The size of the birdhouse should be appropriate for the bird species you wish to attract.

    Color and Finish

    Choose a color that complements the existing color palette of your yard and reflects the overall style. For example:

    • Traditional: Opt for muted, earthy tones like browns, greens, and blues.
    • Modern: Use bold colors, metallic finishes, or clean, white paint.
    • Rustic: Embrace natural wood colors or weathered finishes.
    • Mediterranean: Incorporate warm terracotta tones, yellows, and blues.
    • Asian-inspired: Use calming neutrals, natural wood tones, or black paint.

    Consider using a stain or sealant to protect the birdhouse from the elements and enhance its longevity.

    Details and Accents

    Add details and accents that enhance the birdhouse's visual appeal and complement the overall style of your yard.

    • Traditional: Decorate with latticework, decorative trim, or a small porch.
    • Modern: Use geometric patterns, clean lines, or minimalist accents.
    • Rustic: Add weathered branches, moss, or natural stones.
    • Mediterranean: Include terracotta tiles, decorative ironwork, or a small fountain.
    • Asian-inspired: Incorporate bamboo details, stone accents, or intricate carvings.

    Placement

    The placement of the birdhouse is crucial for both its functionality and aesthetic appeal.

    • Choose a location that is visible from your home or preferred viewing areas.
    • Consider the surrounding landscaping and ensure the birdhouse complements the existing plants and trees.
    • Place the birdhouse away from predators, such as cats or snakes.
    • Ensure the birdhouse receives adequate sunlight and protection from the elements.

    Material Choices for Birdhouses

    The choice of material for your birdhouse plays a significant role in its aesthetic appeal and durability. Here are some common options:

    Wood

    Wood is a classic and versatile material for birdhouses, offering a natural and rustic charm. Choose from a variety of woods, including cedar, redwood, pine, and cypress. Wood can be painted, stained, or left natural.

    Metal

    Metal birdhouses provide durability and a modern aesthetic. Aluminum, steel, and copper are popular choices. Metal birdhouses can be painted or left with their natural finish.

    Plastic

    Plastic is a lightweight and affordable option for birdhouses. It is weather-resistant and easy to clean. However, plastic birdhouses may lack the charm and natural appeal of wood or metal.

    Recycled Materials

    Consider using recycled materials like milk jugs, tin cans, or wooden crates to create a unique and eco-friendly birdhouse.

    Adding Personal Touches

    Once you have designed a birdhouse that complements your yard decor, consider adding personal touches to make it truly unique.

    Decorative Elements

    Incorporate decorative elements that reflect your personal style and interests. Some ideas include:

    • Painting: Use stencils, freehand designs, or a vibrant color scheme.
    • Sculpting: Carve or sculpt details into the birdhouse.
    • Mosaic: Create a mosaic design using glass, tile, or other materials.
    • Nature-inspired decor: Incorporate natural elements like moss, twigs, or small stones.

    Personalized Touches

    Add personal touches that make the birdhouse truly unique.

    • Monogram: Add your initials or a family name.
    • Family crest: Incorporate your family crest or a symbol that has personal meaning.
    • Inspirational quote: Add a short and sweet quote that speaks to your love for birds.

    Conclusion

    Designing a birdhouse that complements your yard decor is a rewarding experience that enhances the beauty of your outdoor space while providing a sanctuary for feathered friends. By understanding the style, color palette, and materials of your existing yard, you can create a birdhouse that seamlessly integrates with your landscape. Remember to consider the shape, size, color, and details of the birdhouse, as well as its placement. With careful planning and a touch of personal creativity, you can create a birdhouse that not only attracts birds but also adds a touch of charm and character to your yard.

    How to Build a Cold Frame for Vegetable Gardens


    How to Build a Cold Frame for Vegetable Gardens

    Building a Cold Frame for Your Vegetable Garden

    A cold frame is a simple and inexpensive structure that can extend your gardening season by providing a warm, protected environment for your plants. This is especially helpful for starting seeds early in the spring or for keeping tender vegetables growing late into the fall. By creating a mini greenhouse effect, cold frames trap solar heat and protect plants from harsh weather conditions.

    Building your own cold frame is a rewarding DIY project that can be tailored to your needs and garden space. This article will guide you through the process, providing step-by-step instructions and tips for success.

    Materials You'll Need

    Before you begin, gather the necessary materials:

    • Wood for the frame: Use sturdy, rot-resistant wood like cedar, redwood, or pressure-treated lumber. Choose 2x4s or 2x6s for the frame and 1x6s for the lid.
    • Glass, polycarbonate panels, or clear plastic sheeting: This will form the cover of your cold frame and trap heat.
    • Hinges: Choose heavy-duty hinges for the lid.
    • Screws or nails: Use weather-resistant screws or galvanized nails for construction.
    • Optional: A soil-filled base layer to insulate the cold frame, weather stripping for a tighter seal, and a vent for increased airflow.

    Choosing the Right Location

    The location of your cold frame is crucial. Choose a spot that receives at least 6 hours of sunlight per day. Ideally, it should be located against a south-facing wall for additional warmth. Also, ensure the area is well-drained to prevent water from pooling inside the frame.

    Building the Cold Frame

    Constructing the Frame

    1. **Cut the wood:** Using a saw, cut the wood for the frame to the desired dimensions. For a standard-sized cold frame, aim for a base of approximately 3 feet wide by 4 feet long and a height of 2 feet.

    2. **Assemble the base:** Join the pieces of wood for the base together using screws or nails, creating a rectangular shape.

    3. **Construct the sides:** Cut the sides of the cold frame to the desired height and attach them to the base. Ensure the sides are securely fastened.

    4. **Build the lid:** Cut the wood for the lid to match the dimensions of the base. Attach hinges to the lid and secure it to the frame.

    Adding the Cover

    1. **Choose your covering:** Glass is the traditional option, but polycarbonate panels or clear plastic sheeting are also effective and more durable.

    2. **Cut the cover:** Measure the opening of the cold frame and cut the glass, panels, or sheeting to size.

    3. **Secure the cover:** Use screws or nails to attach the cover to the frame or use a glazing compound for a more secure and weatherproof seal.

    Optional Features

    1. **Soil Base:** Add a 4-6-inch layer of soil to the bottom of the cold frame for insulation.

    2. **Weather Stripping:** Attach weather stripping around the perimeter of the lid for a tighter seal and better insulation.

    3. **Ventilation:** For warmer days, install a vent at the top of the lid for increased airflow.

    Planting and Care

    1. **Prepare the soil:** Fill the cold frame with a well-drained potting mix or garden soil.

    2. **Plant your seeds or seedlings:** Sow seeds according to the instructions on the seed packet. Transplant seedlings when they are large enough to handle.

    3. **Water regularly:** Monitor moisture levels and water as needed. Avoid overwatering, which can lead to root rot.

    4. **Monitor temperature:** Check the temperature inside the cold frame regularly. Adjust the lid or ventilation to maintain optimal temperatures.

    5. **Protect from pests and diseases:** Monitor your plants for signs of pests or diseases. Take steps to control any issues that arise.

    Enjoy Your Extended Growing Season

    With your cold frame built and ready to go, you can extend your gardening season and enjoy fresh, homegrown vegetables for longer. Enjoy the rewards of your hard work as you watch your plants thrive in the protected environment you've created.

    How to Design a Cold Frame for Your Garden


    How to Design a Cold Frame for Your Garden

    Grow Your Garden with a DIY Cold Frame: An Easy Guide

    Hey there, fellow green thumbs! Are you tired of the unpredictable weather playing havoc with your precious seedlings? Do you dream of extending your growing season and getting a jump start on spring? If so, building a cold frame is your ticket to gardening success.

    A cold frame is basically a mini greenhouse that utilizes the natural warmth of the sun to protect your plants from harsh elements. Think of it as a cozy, protective shelter for your seedlings, allowing them to thrive even when the weather outside is less than ideal. And the best part? Building one yourself is surprisingly simple and affordable.

    This guide will walk you through the steps of designing and building your very own cold frame. Get ready to unleash your inner DIY master and start nurturing those seedlings!

    Planning Your Cold Frame

    Before diving into the construction process, let's brainstorm some key considerations. Think of it as laying the foundation for a thriving cold frame experience.

    1. Location, Location, Location!

    Where you place your cold frame is crucial. Choose a spot that receives ample sunlight, ideally facing south for maximum sun exposure. The location should also be relatively sheltered from strong winds, as they can chill the air inside your frame.

    Consider the layout of your garden and the overall flow. You don't want your cold frame to obstruct pathways or become a tripping hazard. Make sure it's easily accessible for planting, tending, and harvesting.

    2. Size Matters

    Determine the size of your cold frame based on your gardening needs. Will you be starting seedlings for a small kitchen garden, or are you planning a more ambitious planting project?

    A good rule of thumb is to aim for a cold frame that's at least 3 feet wide and 4 feet long. If you have limited space, you can opt for a smaller frame, but remember, the larger the frame, the more seedlings you can nurture!

    3. Material Magic

    Get creative with the materials you choose. A classic cold frame uses wood framing and glass panes for the top, but you can also explore more modern alternatives like polycarbonate panels or even repurposed windows.

    Just make sure the material is clear or translucent to allow sunlight to penetrate and warm the interior.

    Here's a rundown of some popular materials:

    • Wood: A reliable and sturdy option, easily worked with and readily available. Use pressure-treated lumber for durability.
    • Recycled Windows: Give old windows a new life! They offer excellent light transmission and insulation.
    • Polycarbonate Panels: Lightweight and durable, these panels are available in various thicknesses and transmit light well.
    • Glass: Provides exceptional light transmission but can be heavy and prone to breakage.

    Building Your Cold Frame: A Step-by-Step Guide

    Now it's time to bring your cold frame vision to life! Here's a step-by-step guide for building a classic wooden cold frame:

    1. Get Your Tools Ready

    Before you start, gather your essential tools:

    • Circular saw or hand saw
    • Measuring tape
    • Level
    • Drill with assorted bits
    • Screwdriver
    • Safety glasses
    • Work gloves
    • Clamps

    2. Construct the Frame

    Build the frame using pressure-treated lumber. You'll need four long pieces for the sides and two shorter pieces for the ends. Cut the wood to the desired length and width, ensuring all corners are square.

    Join the wood pieces at the corners using screws, securing them firmly. If you're feeling ambitious, you can add corner brackets for extra strength.

    3. Create the Base

    Cut a sheet of plywood or exterior-grade OSB to fit the base of the frame. Attach it securely to the bottom of the frame using screws.

    For added durability, you can also install a layer of landscaping fabric on top of the base before attaching the plywood. This will prevent weeds from popping up inside your cold frame.

    4. Add the Top

    Here's where your chosen material for the top comes into play.

    For a traditional cold frame, cut glass panes to fit the dimensions of the frame. Use glazing points and glazing putty to secure the panes in place.

    If you're using polycarbonate panels, cut them to size using a utility knife or a jigsaw. Secure them to the frame using screws or specialized polycarbonate clips.

    If you're working with recycled windows, measure them carefully and adjust the frame accordingly to accommodate their unique sizes. You can use screws, brackets, or even hinges to attach the windows to the frame.

    5. Incorporate Hinges

    Attach hinges to the top of the frame, allowing you to easily open and close the lid. This will provide ventilation and access for tending your plants.

    You can use standard door hinges or specialized cold frame hinges. Make sure the hinges are strong enough to support the weight of the top, especially if you're using glass.

    6. Add a Lid Prop

    Include a lid prop to keep the top slightly ajar for ventilation. This will prevent condensation buildup and ensure your plants get enough fresh air. You can use a simple wooden prop, a metal latch, or even a rock.

    7. Prime and Paint

    Give your cold frame a protective layer. Apply a primer to the wood frame before painting it with a weather-resistant paint. This will help prevent rot and extend the life of your cold frame.

    Getting Started with Your Cold Frame

    Now that your cold frame is complete, let's dive into the exciting part: planting!

    First, fill the interior with a well-draining potting mix. You can use a seed starting mix, a general-purpose potting mix, or even a homemade mix of compost, vermiculite, and peat moss.

    Next, plant your seedlings. Space them according to their individual needs. Make sure you water them thoroughly, but avoid overwatering, as this can lead to root rot.

    To maintain optimal conditions inside your cold frame, monitor the temperature regularly. During cold spells, you may need to cover the frame with a blanket or tarp to provide additional insulation.

    On sunny days, open the lid for ventilation and let the fresh air circulate. This will help prevent fungal diseases and ensure your seedlings get the necessary air exchange.

    Tips for Cold Frame Success

    Here are some additional tips to help you get the most out of your cold frame:

    • Start with hardy seedlings: Choose varieties that are known to tolerate cool temperatures.
    • Harden off your seedlings: Gradually introduce your seedlings to outdoor conditions before transplanting them into your garden. Start by leaving the lid open for short periods, and gradually increase the exposure time.
    • Ventilate regularly: Keep the lid slightly ajar on warm days to prevent overheating.
    • Monitor for pests: Check your plants regularly for signs of pests or diseases, and take action to control them immediately.
    • Embrace the season: Experiment with different crops and plant types. Use your cold frame to extend your growing season, starting seedlings in the early spring or nurturing them in the late fall.

    Remember, gardening is a journey of discovery. With a little creativity, patience, and a cold frame by your side, you can enjoy a bountiful harvest year-round. Happy gardening!

    Step-by-step diy wooden clock project for beginners


    Step-by-step diy wooden clock project for beginners

    Building Your Own Wooden Clock: A Beginner's Guide

    Crafting a wooden clock is a rewarding project that blends creativity with practical skills. This guide will walk you through the process, step-by-step, enabling you to build your own unique timepiece. Whether you're a seasoned woodworker or just starting out, this project is approachable and enjoyable.

    Materials and Tools

    Before you begin, gather the necessary materials and tools. This list provides a starting point, and you may need to adjust based on your design preferences and available resources:

    Wood

    • Plywood or hardwood board (for the clock face)
    • Wooden dowel (for the clock hands)
    • Optional: Wooden trim or molding (for decorative accents)

    Clock Mechanism

    • Quartz clock movement (with hands)
    • Clock hands (hour, minute, and optional second hand)

    Other Materials

    • Sandpaper (various grits)
    • Wood glue
    • Wood stain or paint (optional)
    • Clear sealant (optional)
    • Clock face paper or vinyl (for numbers or design)
    • Scissors or craft knife
    • Pencil
    • Measuring tape
    • Drill and drill bits (for pilot holes)
    • Screwdrivers (Phillips and flathead)
    • Clamps (for securing pieces)
    • Safety glasses and dust mask

    Project Preparation

    Before you start cutting and assembling, take some time to plan your clock design. Consider the following:

    Clock Face Shape and Size

    • Choose a shape that complements your style. Classic round or square designs are popular, but you can get creative with ovals, hexagons, or even freehand shapes.
    • Determine the desired size of your clock face. Smaller clocks are often more compact, while larger clocks make a statement.

    Clock Hands

    • Select clock hands that suit your design and the size of your clock face. Longer hands are typically used for larger clocks, while shorter hands are suitable for smaller clocks.

    Clock Face Design

    • Decide if you want a minimalist clock face with just hour markers or a more elaborate design with numbers, Roman numerals, or intricate patterns.
    • If you're using clock face paper or vinyl, create a template using design software or by hand. You can find free templates online or use your own creativity.

    Building the Clock Face

    Now, let's build the foundation of your clock:

    Cutting the Clock Face

    • Measure and mark the desired dimensions of your clock face on the plywood or hardwood board. If using a circular design, use a compass or a circular saw to cut a perfect circle.
    • For other shapes, use a jigsaw or a scroll saw for precise cuts. Make sure to cut slowly and carefully to avoid chipping or splintering the wood.
    • Sand the edges of the clock face with fine-grit sandpaper to smooth them out and remove any rough spots.

    Adding Decorative Trim (Optional)

    • If you're incorporating wooden trim or molding, cut it to the desired length and angle, using a miter saw or hand saw for accurate cuts.
    • Apply wood glue to the back of the trim and position it around the edges of the clock face. Clamp it in place until the glue dries completely.
    • Sand the trim flush with the clock face to create a seamless finish.

    Assembling the Clock Mechanism

    Now it's time to install the heart of your clock:

    Attaching the Clock Movement

    • Find the center of the clock face. Mark this point with a pencil. This will be the point where you attach the clock movement.
    • Most clock movements come with mounting screws. Use a drill to create pilot holes at the marked center point, slightly smaller than the mounting screws.
    • Screw the clock movement into place. Ensure the movement is securely attached and aligned in the center of the clock face.

    Installing the Clock Hands

    • The clock movement will have a separate set of screws or a nut for attaching the hands. Place the hour hand on the appropriate shaft, followed by the minute hand.
    • If using a second hand, install it last. Make sure the hands are tightly secured, but don't overtighten them. They should move freely without resistance.

    Adding the Clock Face Design

    Now, personalize your clock with a unique design:

    Applying Clock Face Paper or Vinyl

    • If using clock face paper, carefully cut out the numbers or design from the paper. Use scissors or a craft knife for precise cuts. Align the paper on the clock face and use glue stick to secure it in place. Smooth out any wrinkles or bubbles to ensure a clean application.
    • If using clock face vinyl, apply it using the same technique as you would for a sticker. Use a squeegee to remove any air bubbles and ensure a smooth finish.

    Hand-Painting the Clock Face (Optional)

    • If you prefer a hand-painted design, use a pencil to lightly sketch the numbers or patterns onto the clock face.
    • Use acrylic paint for a smooth and durable finish. Start with light coats of paint and allow each coat to dry completely before applying the next.
    • You can use stencils for more intricate patterns or lettering.

    Finishing Touches

    Your clock is nearly complete, but a few final steps will enhance its appearance and durability:

    Sanding and Finishing

    • Sand the entire clock face, including the trim, with fine-grit sandpaper. This will smooth out any imperfections and create a consistent surface.
    • Apply a wood stain or paint to the clock face to achieve your desired color. Follow the manufacturer's instructions for application and drying time.
    • For added protection and durability, apply a clear sealant, such as polyurethane varnish or lacquer. Apply thin coats, allowing each coat to dry completely before applying the next.

    Mounting the Clock

    • Choose a suitable mounting location for your clock. It should be a sturdy surface where it can be seen easily.
    • You can use a sawtooth hanger, a keyhole slot, or other hanging hardware to attach the clock to the wall. Ensure the clock is securely mounted.

    Setting the Clock

    The final step is to set the clock to the correct time:

    Setting the Time

    • Locate the small knob or button on the back of the clock movement. This is the time setting mechanism.
    • Turn the knob to adjust the time, making sure the hands move smoothly. Set the time to the current hour and minute.

    Congratulations! You have successfully built your own wooden clock. Enjoy your unique timepiece and admire your craftsmanship. Remember, this project is a starting point for customization and creativity. Experiment with different wood types, colors, and designs to create a clock that truly reflects your style and personality.

    Unique Bedside Cabinet Designs to Build Yourself (Download PDF)


    Unique Bedside Cabinet Designs to Build Yourself (Download PDF)

    Unique Bedside Cabinet Designs to Build Yourself (Download PDF)

    Hey there, woodworking enthusiasts! Tired of seeing the same boring bedside cabinets at every furniture store? Don't settle for cookie-cutter designs! Let's explore some unique and functional bedside cabinet ideas you can build yourself. You'll not only save money, but also create a truly personalized piece that reflects your style and needs.

    Building a bedside cabinet is a fantastic project for any skill level. We'll cover a mix of simple and more challenging designs, so you can find something that suits your comfort level and woodworking experience. We'll also talk about some exciting materials and finishes you can explore.

    Ready to unleash your inner designer and craftsman? Let's get started!

    The Design Journey: Finding Your Perfect Style

    The first step is to imagine your dream bedside cabinet. Ask yourself:

    • What kind of aesthetic do you want? Modern, rustic, minimalist, or something else entirely?
    • What's your favorite wood? Think about its color, grain pattern, and how it will complement your bedroom's overall feel.
    • What features are essential? Do you need drawers, shelves, a built-in reading light, or even a hidden compartment for valuables?
    • How much space do you have beside your bed? Take precise measurements to ensure your cabinet will fit comfortably.

    Once you have a clear picture in mind, it's time to start sketching or searching for inspiration. Browse online woodworking communities, furniture design websites, and even vintage magazines for unique ideas.

    Unique Bedside Cabinet Designs: Where Creativity Takes Over

    We're going to dive into some exciting design possibilities that break the mold of typical bedside cabinets. These ideas encourage you to personalize your project and bring your vision to life.

    1. The "Floating" Nightstand: A Sleek and Modern Touch

    For a contemporary look, consider a floating nightstand. It appears to be suspended in mid-air, creating a light and airy feel. Here's how you can achieve this look:

    • The Illusion of Levitation: Use sturdy hidden brackets mounted to the wall to support the tabletop. The design should be robust enough to hold all your bedside essentials.
    • Minimalist Elegance: Opt for clean lines, a simple shape, and maybe a small shelf or drawer for storage. Consider using a sleek material like maple or walnut.
    • Open Storage Options: Think about using a wire mesh basket or a decorative box to store items instead of traditional drawers. This keeps your storage visible and adds a touch of visual interest.

    2. The "Ladder" Nightstand: A Rustic Charm

    If you love a rustic vibe, a ladder-style nightstand could be your perfect match. It's versatile and can be customized to fit your space and storage needs. Here's how to bring this design to life:

    • Rustic Materials: Use reclaimed wood like barnwood or weathered beams to create a truly vintage feel. You can also use untreated pine for a more natural look.
    • Multiple Tiers for Storage: The ladder structure provides ample storage for books, lamps, and decorative accents. You can adjust the rungs to suit your height and the objects you want to store.
    • Personalized Touches: Add rustic hardware like metal hooks or leather straps to create a one-of-a-kind piece. You could even incorporate a small drawer on the bottom for hidden storage.

    3. The "Cube" Nightstand: Minimalism Meets Functionality

    A cube nightstand offers simplicity and practicality. It's a clean canvas for your own creativity and allows for different storage configurations. Here's how to create this design:

    • Geometric Precision: Start with square or rectangular pieces of wood to form the cube structure. Ensure precise cuts and joinery for a professional finish.
    • Versatile Storage Options: You can include drawers, shelves, or even a sliding door for a hidden compartment. Consider using a combination of open and closed storage to create visual interest.
    • Material Choices: Play around with wood species. Light-colored woods like birch or maple offer a fresh, modern feel, while darker woods like mahogany or walnut create a rich and elegant ambiance.

    4. The "Repurposed" Nightstand: Giving Old Things New Life

    Don't underestimate the power of repurposed materials. Old suitcases, vintage drawers, or even repurposed doors can become unique and functional bedside cabinets. Here are some ideas:

    • Suitcase Nightstand: Use an old suitcase as the base and add a simple top made of wood or glass. It's perfect for adding a vintage touch to your bedroom.
    • Drawer Nightstand: Find a set of vintage drawers and combine them to create a unique piece. You can even stain or paint them to match your bedroom's décor.
    • Repurposed Door Nightstand: An old, weathered door can be transformed into a stunning nightstand. Simply add legs and maybe some hardware for a touch of personality.

    Don't Forget the Finishing Touches: Materials and Finishes

    Once you have your design, it's time to choose the right materials and finishes to bring your bedside cabinet to life.

    Wood Choices: Finding Your Perfect Match

    Think about the look and feel you want for your nightstand. Here are some popular options:

    • Maple: Known for its light color, fine grain, and durability.
    • Walnut: Rich brown color with beautiful grain patterns, strong and durable.
    • Cherry: Elegant red-brown hue with a smooth grain, ages beautifully.
    • Oak: Strong and durable, comes in various shades from light to dark.
    • Reclaimed Wood: Adds character and sustainability with its unique textures and patterns.

    Finishes: Adding a Touch of Personality

    The finish you choose will impact your bedside cabinet's overall look and feel. Here are some ideas:

    • Stain: Enhance the natural beauty of the wood by highlighting its grain patterns.
    • Paint: Add a splash of color or create a distressed effect with paint and a bit of sanding.
    • Wax: Provides a protective layer and enhances the wood's natural sheen.
    • Oil: Penetrates the wood and adds a subtle sheen while nourishing the material.
    • Polyurethane: Creates a durable and water-resistant finish.

    Ready to Build Your Dream Bedside Cabinet? Get the Downloadable PDF!

    We hope you're excited about the possibilities! Now that you've got some fantastic ideas, we've got a great resource to help you take the next step. We've created a downloadable PDF with detailed plans, instructions, and tips for building some of the unique bedside cabinet designs we discussed. It's packed with information to help you create your own masterpiece.

    Click the link below to get your free PDF and start building your dream nightstand today!

    (Insert Link to Downloadable PDF)

    Happy building, and may your bedside cabinet be the envy of all your friends!